如何不购买域名在云服务器上搭建HTTPS服务
雪舞轻扬 /
03-23 /
3点赞 /
0评论 /
322阅读
# step 1: 事前准备
## step 1.1: 云服务器
购买一台云服务器(带有弹性公网IP),阿里云,腾讯云,华为云什么的都可以。
选择ubuntu系统
开放安全组策略(把你需要的协议/端口暴露出来):
- TCP:22:ssh
- TCP:80:HTTP
- TCP:443:HTTPS
- ICMP:ping
这里我们强烈不推荐暴露所有的端口,根据权限最小化原则,仅应该暴露你需要的端口

## step 1.2: Caddy
官方文档:
仓库地址:
Caddy是一个强大的反向代理工具,当然也可以被用作站点服务器。本文使用Caddy作为主要配置工具。
安装脚本:
```csharp
sudo apt install -y debian-keyring debian-archive-keyring apt-transport-https
curl -1sLf 'https://dl.cloudsmith.io/public/caddy/stable/gpg.key' | sudo gpg --dearmor -o /usr/share/keyrings/caddy-stable-archive-keyring.gpg
curl -1sLf 'https://dl.cloudsmith.io/public/caddy/stable/debian.deb.txt' | sudo tee /etc/apt/sources.list.d/caddy-stable.list
sudo apt update
sudo apt install caddy
```
安装完成后,应当显示:
```csharp
~# caddy --version
v2.9.1
```
## step 1.3: Apifox
这里安利一波Apifox,可以非常方便的进行接口管理,构造自动化测试等工作,支持RESTful风格的API等。
界面简洁优雅,使用非常方便,并且对于个人开发者来说完全免费,符合我个人的审美观念。
# step 2:获取证书
众所周知,HTTPS相比于HTTP,其最大的特性就是使用了SSL/TLS对数据进行加密。
我们依赖证书链使用TLS在客户端和服务器之间建立可信连接,具体原理比较复杂这里不多解释。
一般来说,证书是要由CA来进行签发,如果你购买了域名,自然会获取对应的证书。
但是,此处我们没有购买形似`example.com`的域名,而是类似`149.33.138.14`这样的裸露公网IP,这就需要我们提前获取对于裸IP的证书支持。
但遗憾的是,绝大部分针对裸IP的证书都需要收费。
毕竟,**奇迹和魔法可不是免费的**,https和域名当然也不是,大家都是穷人,尽量还是少花点钱。
## step 2.1 获取免费证书
所幸,这里有一个方法,可以对裸IP获取90天的免费证书,到期相同方法续期即可
该服务由zeroSSL提供,我们使用的Caddy也是zeroSSL下的项目之一
这个教程写的还挺详细的,这里就不抄过来了:
但是,这里我们需要保证`IP地址+文件夹+文件`能够访问,这里我们需要使用Caddy先建立一个最简单的HTTP server,从服务器上获取静态文件
首先查看80端口(http),确保未被监听:
```csharp
root@hcss-ecs-0ef3:~# sudo lsof -i :80
root@hcss-ecs-0ef3:~#
```
在当前路径下创建Caddyfile(可以理解为配置文件),需要设定为http,`file_server`支持静态文件访问,`/var/www/html`为server的根文件目录
```csharp
{
root * /var/www/html
file_server
}
```
创建`.well-known/pki-validation/`路径并且将文件拷贝到路径下:
```csharp
sudo mkdir -p /var/www/html/.well-known/pki-validation
sudo cp /path/to/{filename}.txt /var/www/html/.well-known/pki-validation/
```
caddy的管理端口默认为`localhost:2019`,如果发现端口被占用,可以通过`sudo lsof -i :2019`查看是谁占用了
有可能是自动启动的caddy systemd service和手动启动的caddy发生冲突了
这里我们选择手动启动,将service disable掉:
```csharp
sudo systemctl status caddy
sudo systemctl stop caddy
sudo systemctl status caddy
```
此时应当观察到service状态为`Active: inactive (dead)`,确定port 2019无人监听后可以重新手动启动caddy:
```csharp
sudo caddy stop
caddy fmt --overwrite
sudo caddy start
```
如果想要更改默认2019端口,可以配置`CADDY_ADMIN`环境变量,此处不再赘述。
此时再次查看80端口(http),应当已经被监听:
```csharp
root@hcss-ecs-0ef3:~# sudo lsof -i :80
COMMAND PID USER FD TYPE DEVICE SIZE/OFF NODE NAME
caddy 65370 root 9u IPv6 562057 0t0 TCP *:http (LISTEN)
```
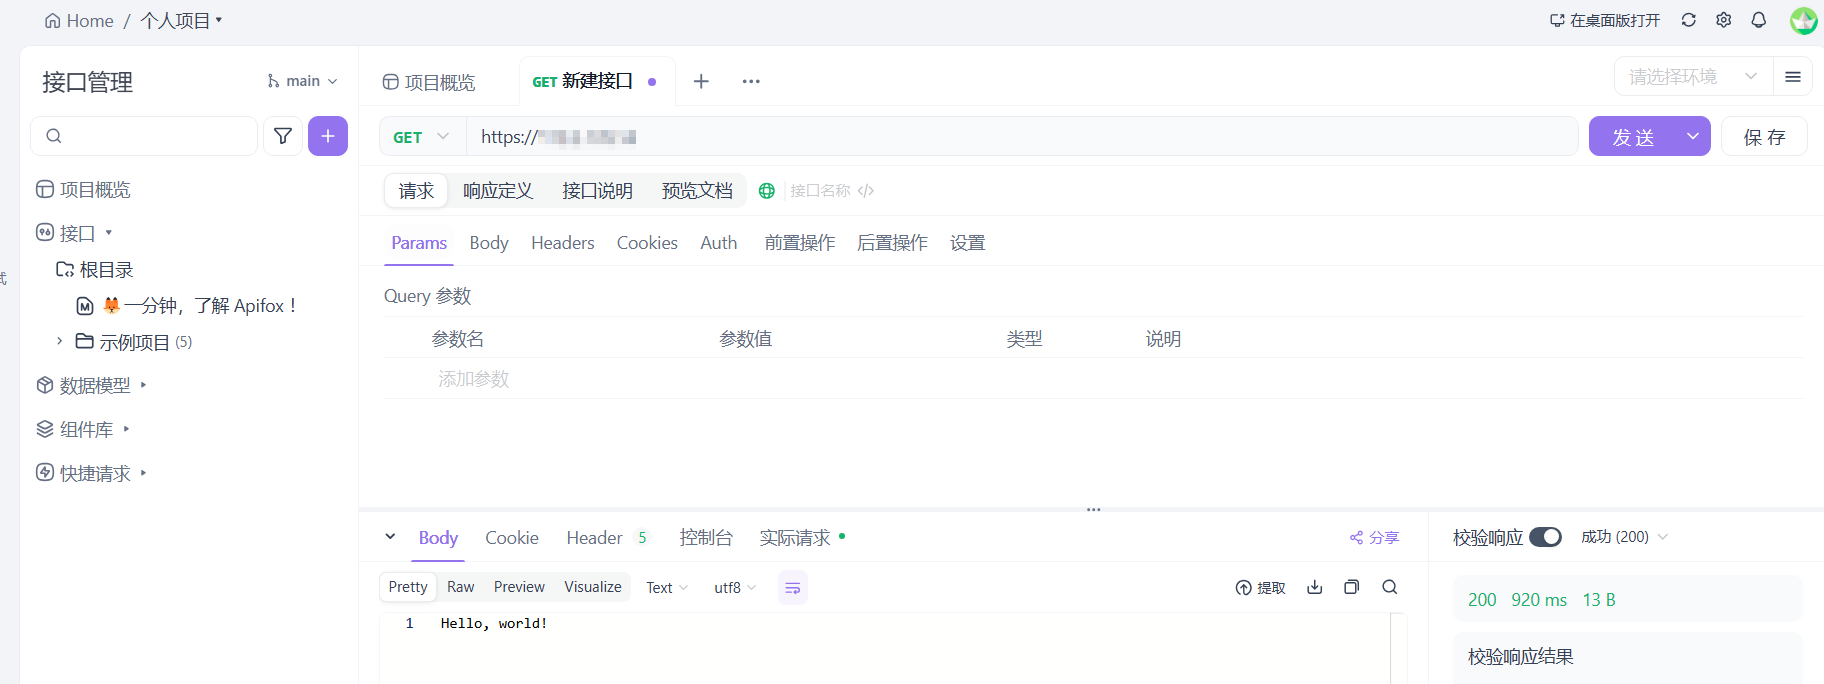
此时可以开始验证http server是否能够被访问,查看是否有文件内容:
方法一:`curl -X GET `

方法二:使用Apifox,设置GET方法和request:
至此,HTTP server设置并验证完毕,返回zeroSSL,点击验证并签发证书,下载文件列表如下:
- certificate.crt:根节点证书
- ca\_bundle.crt:中间节点证书
- private.key:密钥
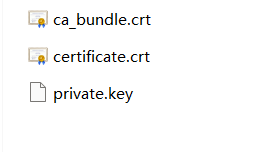
将以上证书文件上传到服务器中。
## step 2.2 搭建https server
### step 2.2.1 验证证书合法性
我们将证书存储在`/etc/caddy/ssl`路径下,统一管理:
```csharp
sudo mkdir -p /etc/caddy/ssl
sudo cp certificate.crt /etc/caddy/ssl/
sudo cp ca_bundle.crt /etc/caddy/ssl/
sudo cp your_private.key /etc/caddy/ssl/
```
设置权限:
```csharp
sudo chmod 600 /etc/caddy/ssl/*
sudo chown -R root:root /etc/caddy/ssl/
```
验证证书链是否完成,应当输出OK:
```csharp
openssl verify -CAfile /etc/caddy/ssl/ca_bundle.crt /etc/caddy/ssl/certificate.crt
```
验证私钥和证书是否匹配,两者输出应当相同:
```csharp
openssl x509 -noout -modulus -in /etc/caddy/ssl/certificate.crt | openssl md5
openssl rsa -noout -modulus -in /etc/caddy/ssl/private.key | openssl md5
```
出于使用简单的考虑,我们首先拼接证书链:
```csharp
cat /etc/caddy/ssl/certificate.crt /etc/caddy/ssl/ca_bundle.crt > /etc/caddy/ssl/fullchain.crt
```
再次验证证书内容:
```csharp
openssl x509 -in /etc/caddy/ssl/fullchain.crt -text -noout
openssl rsa -in /etc/caddy/ssl/private.key -check
```
### step 2.2.2 搭建
首先查看443端口(https),确保未被监听:
```csharp
root@hcss-ecs-0ef3:~# sudo lsof -i :443
root@hcss-ecs-0ef3:~#
```
修改Caddyfile,这是一个最简单的server配置:
```csharp
{default_sni 149.33.138.14
}
{tls /etc/caddy/ssl/fullchain.crt /etc/caddy/ssl/private.keyrespond "Hello, world!" 200
}
```
重新启动caddy服务:
```csharp
sudo caddy stop
caddy fmt --overwrite
sudo caddy start
```
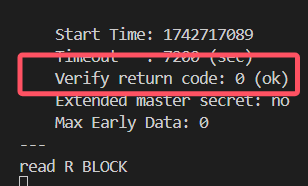
此时在另一台服务器上运行:
```csharp
openssl s_client -connect 149.33.138.14:443 -servername 149.33.138.14
```
Verify return code应当返回:0 (ok)
在另一台服务器上执行`curl -kv `,可以查看到连接全过程:
```csharp
xiao@DESKTOP-S896N2C:~$ curl -kv
* Trying 149.33.138.14:443...
* Connected to 149.33.138.14 (149.33.138.14) port 443 (#0)
* ALPN, offering h2
* ALPN, offering http/1.1
* TLSv1.0 (OUT), TLS header, Certificate Status (22):
* TLSv1.3 (OUT), TLS handshake, Client hello (1):
* TLSv1.2 (IN), TLS header, Certificate Status (22):
* TLSv1.3 (IN), TLS handshake, Server hello (2):
* TLSv1.2 (IN), TLS header, Finished (20):
* TLSv1.2 (IN), TLS header, Supplemental data (23):
* TLSv1.3 (IN), TLS handshake, Encrypted Extensions (8):
* TLSv1.2 (IN), TLS header, Supplemental data (23):
* TLSv1.3 (IN), TLS handshake, Certificate (11):
* TLSv1.2 (IN), TLS header, Supplemental data (23):
* TLSv1.3 (IN), TLS handshake, CERT verify (15):
* TLSv1.2 (IN), TLS header, Supplemental data (23):
* TLSv1.3 (IN), TLS handshake, Finished (20):
* TLSv1.2 (OUT), TLS header, Finished (20):
* TLSv1.3 (OUT), TLS change cipher, Change cipher spec (1):
* TLSv1.2 (OUT), TLS header, Supplemental data (23):
* TLSv1.3 (OUT), TLS handshake, Finished (20):
* SSL connection using TLSv1.3 / TLS_AES_128_GCM_SHA256
* ALPN, server accepted to use h2
* Server certificate:
* subject: CN=119.3.178.14
* start date: Mar 22 00:00:00 2025 GMT
* expire date: Jun 20 23:59:59 2025 GMT
* issuer: C=AT; O=ZeroSSL; CN=ZeroSSL RSA Domain Secure Site CA
* SSL certificate verify result: unable to get local issuer certificate (20), continuing anyway.
* Using HTTP2, server supports multiplexing
* Connection state changed (HTTP/2 confirmed)
* Copying HTTP/2 data in stream buffer to connection buffer after upgrade: len=0
* TLSv1.2 (OUT), TLS header, Supplemental data (23):
* TLSv1.2 (OUT), TLS header, Supplemental data (23):
* TLSv1.2 (OUT), TLS header, Supplemental data (23):
* Using Stream ID: 1 (easy handle 0x559918bdf9f0)
* TLSv1.2 (OUT), TLS header, Supplemental data (23):
> GET / HTTP/2
> Host: 149.33.138.14
> user-agent: curl/7.81.0
> accept: */*
>
* TLSv1.2 (IN), TLS header, Supplemental data (23):
* TLSv1.3 (IN), TLS handshake, Newsession Ticket (4):
* TLSv1.2 (IN), TLS header, Supplemental data (23):
* Connection state changed (MAX_CONCURRENT_STREAMS == 250)!
* TLSv1.2 (OUT), TLS header, Supplemental data (23):
* TLSv1.2 (IN), TLS header, Supplemental data (23):
* TLSv1.2 (IN), TLS header, Supplemental data (23):
* TLSv1.2 (IN), TLS header, Supplemental data (23):
< HTTP/2 200
< alt-svc: h3=":443"; ma=2592000
< content-type: text/plain; charset=utf-8
< server: Caddy
< content-length: 13
< date: Sun, 23 Mar 2025 08:07:31 GMT
<
* TLSv1.2 (IN), TLS header, Supplemental data (23):
* Connection #0 to host 149.33.138.14 left intact
```
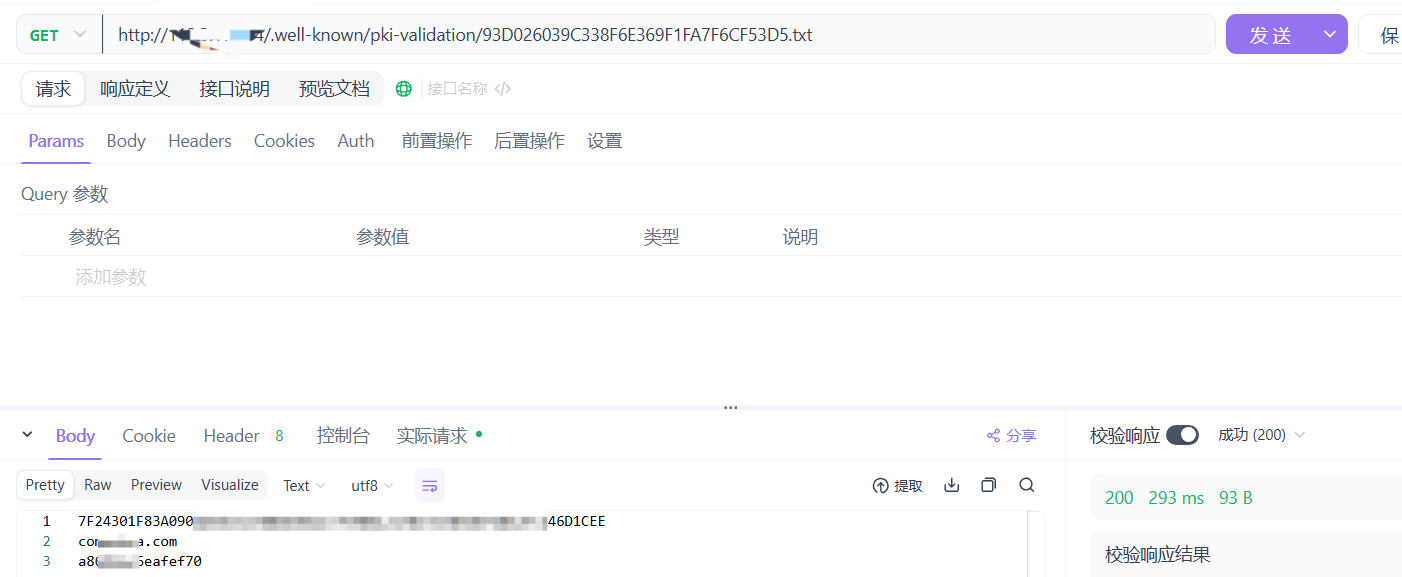
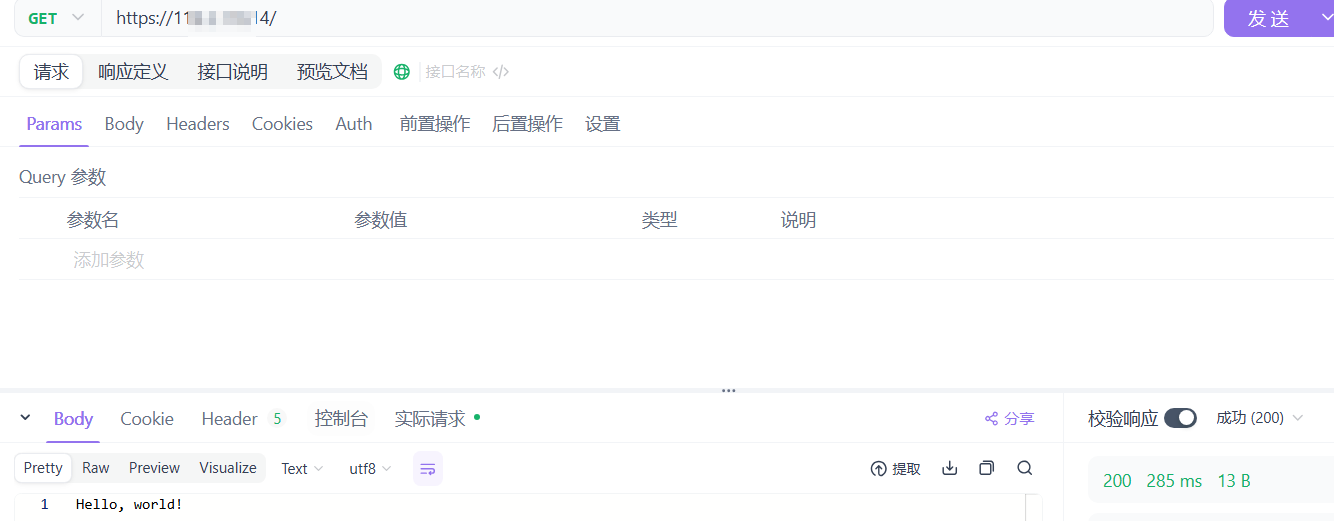
通过Apifox访问,能够正确响应输出: Hello, world!:
在浏览器中也能够正常访问,且没有任何安全问题:
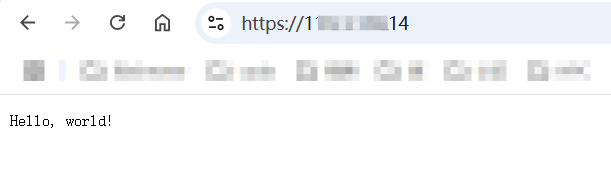
至此,一个最简单的HTTPS server搭建完成。
# 过程中会踩的坑和可能遇到的问题
## 搭建http server时无法访问
表现:
```csharp
2025/03/22 18:52:20.394 INFO http.auto_https server is listening only on the HTTPS port but has no TLS connection policies; adding one to enable TLS{"server_name": "srv0", "https_port": 443}
2025/03/22 18:52:20.394 INFO http.auto_https enabling automatic HTTP->HTTPS redirects {"server_name": "srv0"}
```
原因:http请求被重定向,可能是由于Caddyfile写成了这样:
```csharp
119.3.178.14 {
root * /var/www/html
file_server
}
```
解决方案:单纯一个caddy已经可以作为http server了,但是会caddy自动重定向http到https,所以需要显式指定http
## 启动caddy失败
首先看日志,`lsof`监测对应端口是否被占用。
手动启动的和自动启动的systemd.service是有冲突的,只能启动一个,使用的Caddyfile也不同
## https无法访问 Verify return code: 21 (unable to verify the first certificate)
openssl验证出现:`Verify return code: 21 (unable to verify the first certificate)`
**裸ip server**的server name(域名则无事)
所以在Caddyfile中一定需要:
```csharp
{default_sni 119.3.178.14
}
```
## 请求返回 405 The method is not allowed for the requested URL
这个问题大概率是由于混合使用了`GET`和`POST`方法,比如获取文件的方式是`GET`
## curl -v 报错 TLSv1.3 (IN), TLS alert, internal error (592):
如果证书链分开,caddy似乎无法以这种方式建立TLS可信连接:
```csharp
tls /etc/caddy/ssl/certificate.crt /etc/caddy/ssl/your_private.key {
ca_root /etc/caddy/ssl/ca_bundle.crt
}
```
本文来自投稿,不代表本站立场,如若转载,请注明出处:http//www.knowhub.vip/share/2/1422
- 热门的技术博文分享
- 1 . ESP实现Web服务器
- 2 . 从零到一:打造高效的金仓社区 API 集成到 MCP 服务方案
- 3 . 使用C#构建一个同时问多个LLM并总结的小工具
- 4 . .NET 原生驾驭 AI 新基建实战系列Milvus ── 大规模 AI 应用的向量数据库首选
- 5 . 在Avalonia/C#中使用依赖注入过程记录
- 6 . [设计模式/Java] 设计模式之工厂方法模式
- 7 . 5. RabbitMQ 消息队列中 Exchanges(交换机) 的详细说明
- 8 . SQL 中的各种连接 JOIN 的区别总结!
- 9 . JavaScript 中防抖和节流的多种实现方式及应用场景
- 10 . SaltStack 远程命令执行中文乱码问题
- 11 . 推荐10个 DeepSeek 神级提示词,建议搜藏起来使用
- 12 . C#基础:枚举、数组、类型、函数等解析
- 13 . VMware平台的Ubuntu部署完全分布式Hadoop环境
- 14 . C# 多项目打包时如何将项目引用转为包依赖
- 15 . Chrome 135 版本开发者工具(DevTools)更新内容
- 16 . 从零创建npm依赖,只需执行一条命令
- 17 . 关于 Newtonsoft.Json 和 System.Text.Json 混用导致的的序列化不识别的问题
- 18 . 大模型微调实战之训练数据集准备的艺术与科学
- 19 . Windows快速安装MongoDB之Mongo实战
- 20 . 探索 C# 14 新功能:实用特性为编程带来便利
- 相关联分享
- 如何不购买域名在云服务器上搭建HTTPS服务