ESP实现Web服务器
笔记哥 /
05-24 /
46点赞 /
0评论 /
796阅读
# ESP实现Web服务器
典型的基于 ESP32 的静态网页与图片嵌入展示的 **本地 Web Server(AP 模式)项目**
* * *
## 项目功能概述
>
>
> ESP32 创建一个 Wi-Fi 热点,启动一个 HTTP Web Server,当手机或电脑连接到此热点时,可以通过浏览器(192.168.4.1)访问静态网页(index.html)以及显示嵌入的图片(pic.png)。
>
* * *
## 代码逻辑结构分析
### 1. **嵌入资源声明**
```c
//html网页文件
extern const uint8_t _binary_index_html_start[];
extern const uint8_t _binary_index_html_end[];
//png图片文件
extern const uint8_t _binary_pic_png_start[];
extern const uint8_t _binary_pic_png_end[];
```
- 使用 `idf_component_register(... EMBED_FILES ...)` 将 `index.html` 和 `pic.png` 文件**嵌入到固件**中。
- 这几个符号由构建系统自动生成,用于访问文件在 Flash 中的位置。
* * *
### 2. **HTTP 处理器函数**
#### index\_handler:返回网页
```c
static esp_err_t index_handler(httpd_req_t *req)
{
httpd_resp_set_type(req, "text/html");
return httpd_resp_send(req, (const char *)_binary_index_html_start, _binary_index_html_end - _binary_index_html_start);
}
```
#### ️ pic\_handler:返回图片
```c
static esp_err_t pic_handler(httpd_req_t *req)
{
httpd_resp_set_type(req, "image/png");
return httpd_resp_send(req, (const char *)_binary_pic_png_start, _binary_pic_png_end - _binary_pic_png_start);
}
```
* * *
### 3. **启动 Web 服务器**
```c
httpd_handle_t start_webserver(void)
{
httpd_config_t config = HTTPD_DEFAULT_CONFIG();
httpd_handle_t server = NULL;
if (httpd_start(&server, &config) == ESP_OK) {
// 注册网页 URI
httpd_register_uri_handler(server, &index_uri);
// 注册图片 URI
httpd_register_uri_handler(server, &pic_uri);
}
return server;
}
```
- `/`:返回 `index.html`
- `/pic.png`:返回图片内容
* * *
### 4. **配置 Wi-Fi 为 AP 模式**
```c
void wifi_init_softap()
{
// 初始化网络接口
ESP_ERROR_CHECK(esp_netif_init());
// 创建默认的事件循环
ESP_ERROR_CHECK(esp_event_loop_create_default());
// 创建默认的WiFi AP网络接口
esp_netif_create_default_wifi_ap();
// 初始化WiFi配置
wifi_init_config_t cfg = WIFI_INIT_CONFIG_DEFAULT();
// 初始化WiFi
ESP_ERROR_CHECK(esp_wifi_init(&cfg));
// 设置WiFi配置
wifi_config_t wifi_config = {
.ap = {
.ssid = "ESP32_WEB", // 设置AP的SSID
.ssid_len = strlen("ESP32_WEB"), // 设置SSID的长度
.password = "12345678", // 设置AP的密码
.max_connection = 2, // 设置最大连接数
.authmode = WIFI_AUTH_WPA_WPA2_PSK // 设置认证模式
},
};
// 如果密码为空,则设置为开放模式
if (strlen((char *)wifi_config.ap.password) == 0)
wifi_config.ap.authmode = WIFI_AUTH_OPEN;
// 设置WiFi模式为AP
ESP_ERROR_CHECK(esp_wifi_set_mode(WIFI_MODE_AP));
// 设置WiFi配置
ESP_ERROR_CHECK(esp_wifi_set_config(WIFI_IF_AP, &wifi_config));
// 启动WiFi
ESP_ERROR_CHECK(esp_wifi_start());
// 打印AP已启动的信息
ESP_LOGI(TAG, "Wi-Fi AP started. SSID:%s password:%s", "ESP32_WEB", "12345678");
}
```
- ESP32 开启 AP 模式,创建名为 `ESP32_WEB` 的热点,密码为 `12345678`
- 支持最多 `2` 个客户端连接
- 一旦连接上,就可以通过 IP 访问该 Web Server(默认 192.168.4.1)
* * *
### 5. **程序入口 app\_main()**
```c
void app_main()
{
nvs_flash_init(); // 初始化 NVS
wifi_init_softap(); // 启动热点(设置为AP模式)
start_webserver(); // 启动 Web 服务
}
```
* * *
## ✅ 总结(功能模块)
| 模块 | 功能 |
| --- | --- |
| `wifi_init_softap` | 启动 Wi-Fi 热点(AP) |
| `start_webserver` | 启动 HTTP Web 服务器 |
| `index_handler` | 处理 `/` 请求,返回网页 |
| ️ `pic_handler` | 处理 `/pic.png` 请求,返回嵌入图片 |
| `EMBED_FILES` | 将静态资源嵌入到固件中 |
* * *
## 简单插入图片例程:
html文件:
```html
ESP32 Web Server
 ```
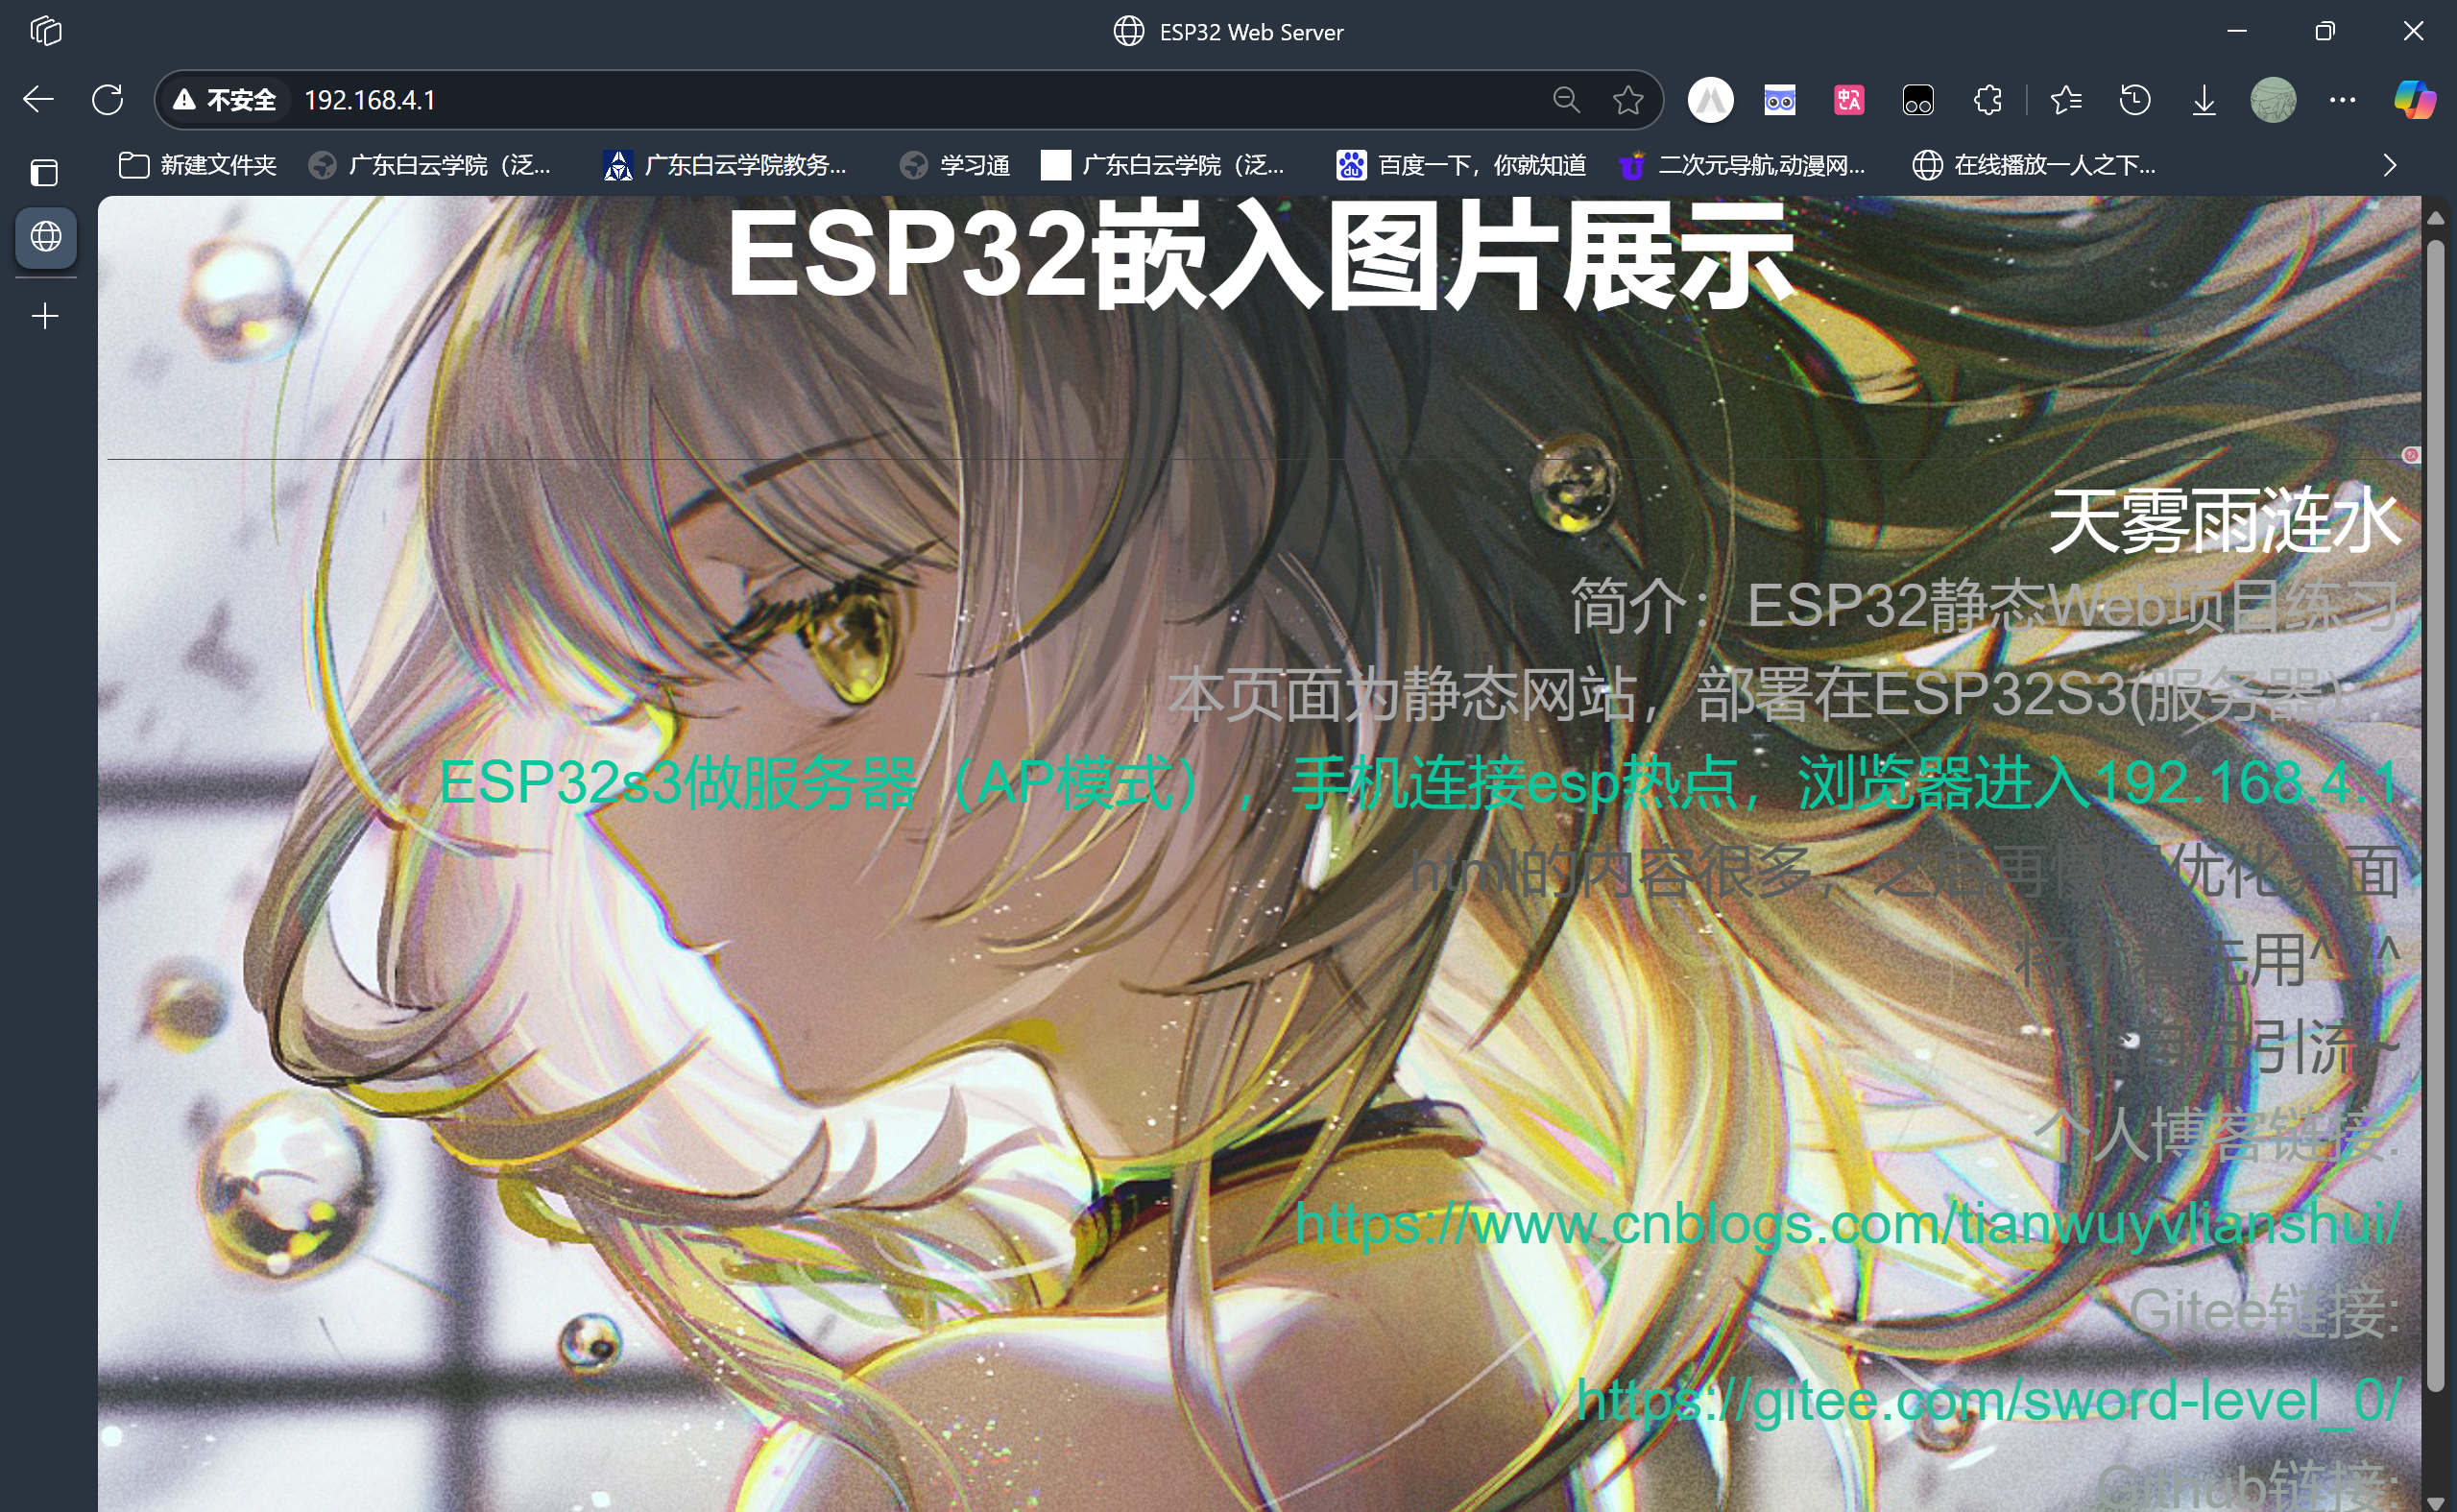
现象:
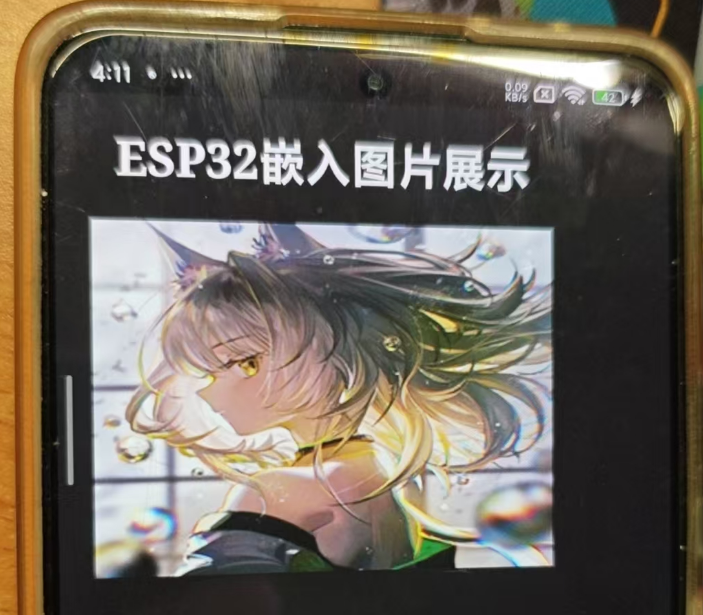
## 插入高清图片,并添加文本标题,简单设计静态界面:
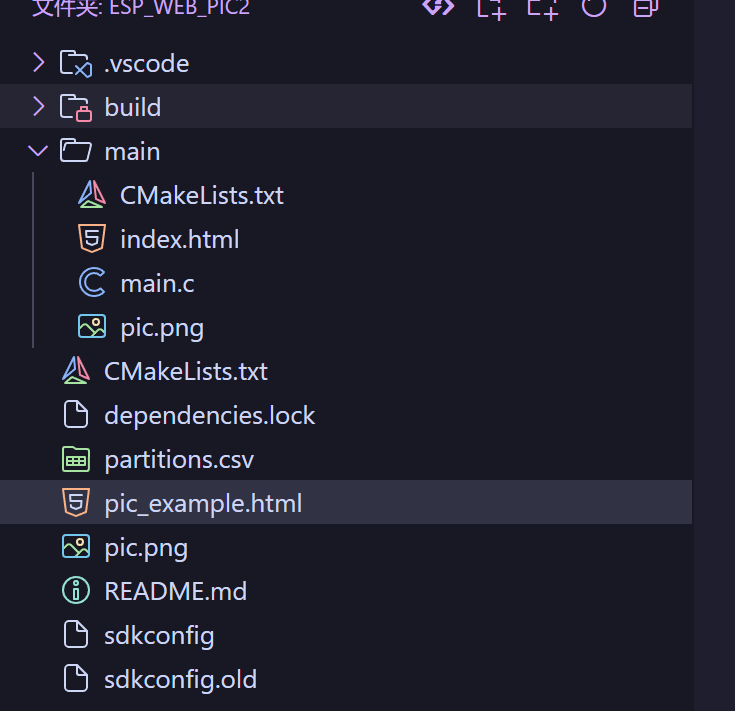
### 工程框架:
### 概括:
**ESP32s3**做**服务器**,使用AP模式开启热点。
**客户端**(手机,电脑)连接热点,与**ESP32s3**形成局域网通信。
客户端通过http请求服务器,服务器响应,返回html和图片
**项目的功能实现**是依靠 **ESP-IDF 提供的 HTTP Server 组件(`esp_http_server`)作为底层核心支持**的。
* * *
## HTTP Server 的核心作用
ESP-IDF 中的 `esp_http_server` 是一个轻量级、嵌入式的 HTTP 服务模块,它提供了一套完整的 **HTTP 请求响应框架**,就像一个 Web 后端框架一样,只是运行在 ESP32 芯片上。
### ✅ 它在项目中实现了的功能
| 功能 | 依赖`esp_http_server`实现 | 描述 |
| --- | --- | --- |
| 启动 Web 服务器 | ✅ `httpd_start()` | 初始化一个监听端口(默认 80)的 Web Server |
| 注册路由(URI) | ✅ `httpd_register_uri_handler()` | 绑定某个路径(如 `/` 或 `/pic.png`)到特定处理函数 |
| 处理 HTTP 请求 | ✅ `index_handler`, `pic_handler` | 根据请求的 URI 进行内容响应 |
| 设置响应类型 | ✅ `httpd_resp_set_type()` | 设置返回数据类型:`text/html`, `image/png` |
| 返回数据内容 | ✅ `httpd_resp_send()` | 把嵌入的 HTML / PNG 数据返回给客户端 |
```txt
[浏览器发起请求]
|
v
[ESP32 HTTP Server] <--------- 启动于 SoftAP 模式下(默认 IP:192.168.4.1)
|
┌──────────────┬──────────────┐
│ │ │
v v v
/ /pic.png 其余
(index_handler) (pic_handler)
返回:
- text/html → index.html(嵌入)
- image/png → pic.png(嵌入)
```
# 源码分享:
[jianzhiji/blog: 博客分享的代码](https://github.com/jianzhiji/blog)
```
现象:

## 插入高清图片,并添加文本标题,简单设计静态界面:

### 工程框架:

### 概括:
**ESP32s3**做**服务器**,使用AP模式开启热点。
**客户端**(手机,电脑)连接热点,与**ESP32s3**形成局域网通信。
客户端通过http请求服务器,服务器响应,返回html和图片
**项目的功能实现**是依靠 **ESP-IDF 提供的 HTTP Server 组件(`esp_http_server`)作为底层核心支持**的。
* * *
## HTTP Server 的核心作用
ESP-IDF 中的 `esp_http_server` 是一个轻量级、嵌入式的 HTTP 服务模块,它提供了一套完整的 **HTTP 请求响应框架**,就像一个 Web 后端框架一样,只是运行在 ESP32 芯片上。
### ✅ 它在项目中实现了的功能
| 功能 | 依赖`esp_http_server`实现 | 描述 |
| --- | --- | --- |
| 启动 Web 服务器 | ✅ `httpd_start()` | 初始化一个监听端口(默认 80)的 Web Server |
| 注册路由(URI) | ✅ `httpd_register_uri_handler()` | 绑定某个路径(如 `/` 或 `/pic.png`)到特定处理函数 |
| 处理 HTTP 请求 | ✅ `index_handler`, `pic_handler` | 根据请求的 URI 进行内容响应 |
| 设置响应类型 | ✅ `httpd_resp_set_type()` | 设置返回数据类型:`text/html`, `image/png` |
| 返回数据内容 | ✅ `httpd_resp_send()` | 把嵌入的 HTML / PNG 数据返回给客户端 |
```txt
[浏览器发起请求]
|
v
[ESP32 HTTP Server] <--------- 启动于 SoftAP 模式下(默认 IP:192.168.4.1)
|
┌──────────────┬──────────────┐
│ │ │
v v v
/ /pic.png 其余
(index_handler) (pic_handler)
返回:
- text/html → index.html(嵌入)
- image/png → pic.png(嵌入)
```
# 源码分享:
[jianzhiji/blog: 博客分享的代码](https://github.com/jianzhiji/blog)
ESP32嵌入图片展示
```
现象:

## 插入高清图片,并添加文本标题,简单设计静态界面:

### 工程框架:

### 概括:
**ESP32s3**做**服务器**,使用AP模式开启热点。
**客户端**(手机,电脑)连接热点,与**ESP32s3**形成局域网通信。
客户端通过http请求服务器,服务器响应,返回html和图片
**项目的功能实现**是依靠 **ESP-IDF 提供的 HTTP Server 组件(`esp_http_server`)作为底层核心支持**的。
* * *
## HTTP Server 的核心作用
ESP-IDF 中的 `esp_http_server` 是一个轻量级、嵌入式的 HTTP 服务模块,它提供了一套完整的 **HTTP 请求响应框架**,就像一个 Web 后端框架一样,只是运行在 ESP32 芯片上。
### ✅ 它在项目中实现了的功能
| 功能 | 依赖`esp_http_server`实现 | 描述 |
| --- | --- | --- |
| 启动 Web 服务器 | ✅ `httpd_start()` | 初始化一个监听端口(默认 80)的 Web Server |
| 注册路由(URI) | ✅ `httpd_register_uri_handler()` | 绑定某个路径(如 `/` 或 `/pic.png`)到特定处理函数 |
| 处理 HTTP 请求 | ✅ `index_handler`, `pic_handler` | 根据请求的 URI 进行内容响应 |
| 设置响应类型 | ✅ `httpd_resp_set_type()` | 设置返回数据类型:`text/html`, `image/png` |
| 返回数据内容 | ✅ `httpd_resp_send()` | 把嵌入的 HTML / PNG 数据返回给客户端 |
```txt
[浏览器发起请求]
|
v
[ESP32 HTTP Server] <--------- 启动于 SoftAP 模式下(默认 IP:192.168.4.1)
|
┌──────────────┬──────────────┐
│ │ │
v v v
/ /pic.png 其余
(index_handler) (pic_handler)
返回:
- text/html → index.html(嵌入)
- image/png → pic.png(嵌入)
```
# 源码分享:
[jianzhiji/blog: 博客分享的代码](https://github.com/jianzhiji/blog)
本文来自投稿,不代表本站立场,如若转载,请注明出处:http//www.knowhub.vip/share/2/3654
- 热门的技术博文分享
- 1 . ESP实现Web服务器
- 2 . 从零到一:打造高效的金仓社区 API 集成到 MCP 服务方案
- 3 . 使用C#构建一个同时问多个LLM并总结的小工具
- 4 . .NET 原生驾驭 AI 新基建实战系列Milvus ── 大规模 AI 应用的向量数据库首选
- 5 . 在Avalonia/C#中使用依赖注入过程记录
- 6 . [设计模式/Java] 设计模式之工厂方法模式
- 7 . 5. RabbitMQ 消息队列中 Exchanges(交换机) 的详细说明
- 8 . SQL 中的各种连接 JOIN 的区别总结!
- 9 . JavaScript 中防抖和节流的多种实现方式及应用场景
- 10 . SaltStack 远程命令执行中文乱码问题
- 11 . 推荐10个 DeepSeek 神级提示词,建议搜藏起来使用
- 12 . C#基础:枚举、数组、类型、函数等解析
- 13 . VMware平台的Ubuntu部署完全分布式Hadoop环境
- 14 . C# 多项目打包时如何将项目引用转为包依赖
- 15 . Chrome 135 版本开发者工具(DevTools)更新内容
- 16 . 从零创建npm依赖,只需执行一条命令
- 17 . 关于 Newtonsoft.Json 和 System.Text.Json 混用导致的的序列化不识别的问题
- 18 . 大模型微调实战之训练数据集准备的艺术与科学
- 19 . Windows快速安装MongoDB之Mongo实战
- 20 . 探索 C# 14 新功能:实用特性为编程带来便利
- 相关联分享
- ESP实现Web服务器